This comprehensive guide will present an easy-to-follow roadmap to help you set up Google Indexing API on your Blogger website and ensure your posts are indexed swiftly, thereby improving your blog's search engine optimization (SEO).
What is Google Indexing API?
It is a powerful tool put forth by Google
aimed to streamline and expedite the indexing process of websites in the search
engine. In our digitally dominated world, having your website appear in SERPs
is critical for visibility, traffic, and ultimately success.
Fundamentally, it is a channel of
communication between your website and Google’s search mechanism, serving to
update Google about any recent changes to your site like new pages, updated
information, or deleted content.
Benefits of using Google API for Blogger websites
In today's competitive online environment, utilizing the right tools can make all the difference for your blogging success. Among the arsenal of efficient tools available to bloggers, the API stands out as an indispensable resource.
When you publish a new blog
post, you naturally want it to be found as quickly as possible on search
engines. While Google's crawlers work diligently to index new content, the
process can often take several days. With API, you can significantly shorten this
waiting period. By submitting your URLs directly to the API, your pages are
crawled and indexed promptly, making your latest content more accessible to
users at the earliest possible opportunity.
Occasionally, it might be
necessary to delete certain blog posts or pages, whether they've become
obsolete or irrelevant. However, the traditional crawling process can take time
to recognize these deletions. By employing this, you can accelerate the removal
of such content from Google's search results. This prevents users from
encountering error pages (e.g., 404 errors) and contributes to better user
experience.
One of the most crucial
aspects of a successful blog is strong SEO performance. It can assist bloggers
in climbing search engine rankings by facilitating faster indexing,
timely content updates, and efficient deletion of defunct content. Ultimately,
this contributes to a more vibrant online presence and enhanced opportunities
to reach your target audience.
Step-by-Step Guide to Setting Up Google Indexing API
In this
step-by-step guide, you’ll learn how to easily implement this powerful tool to
make sure your website gets indexed by Google efficiently. So, let's get
started!
Visit the Cloud Console and create a new
project. Name your project understandably - perhaps after your blog name - then
click on "Create."
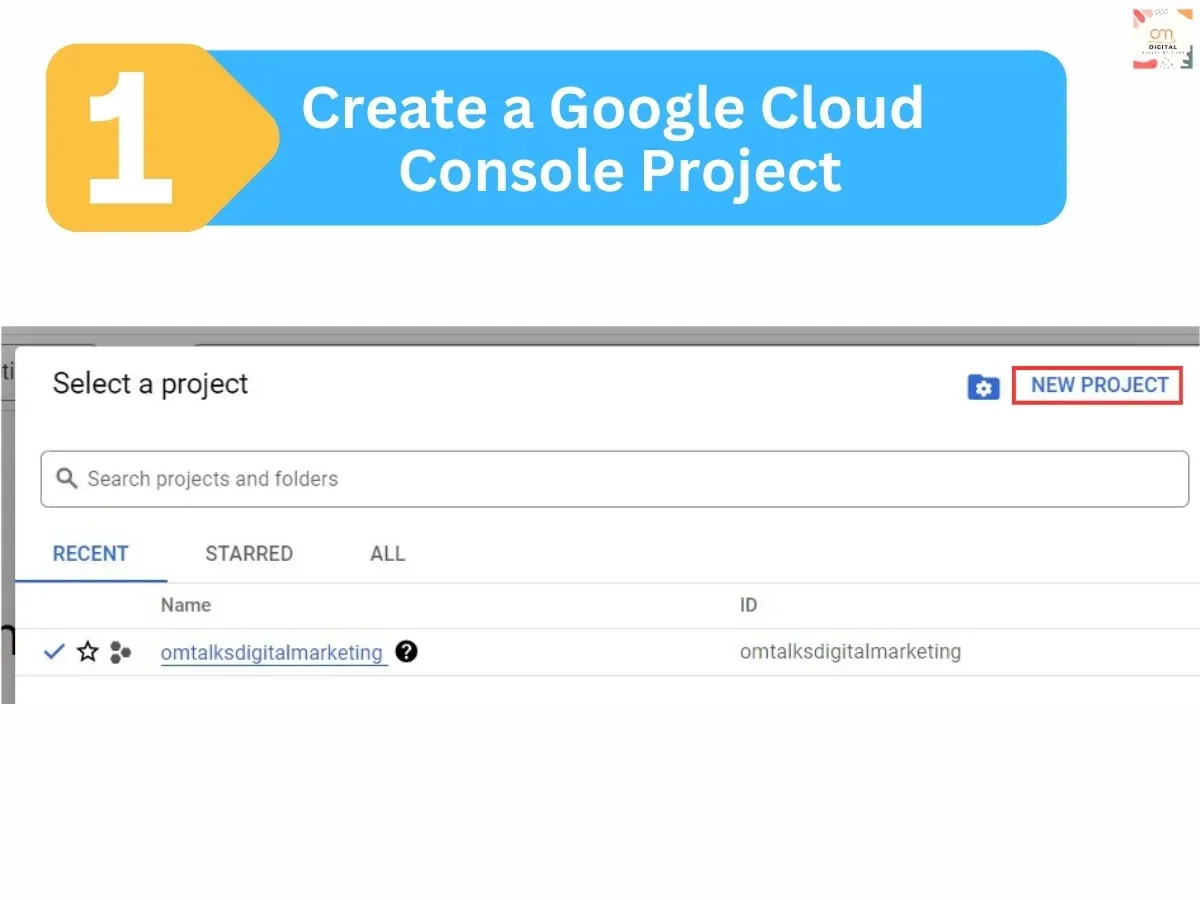 Note: Ensure
that you create a Cloud console project using an email ID associated with your
Blogger website and Search Console.
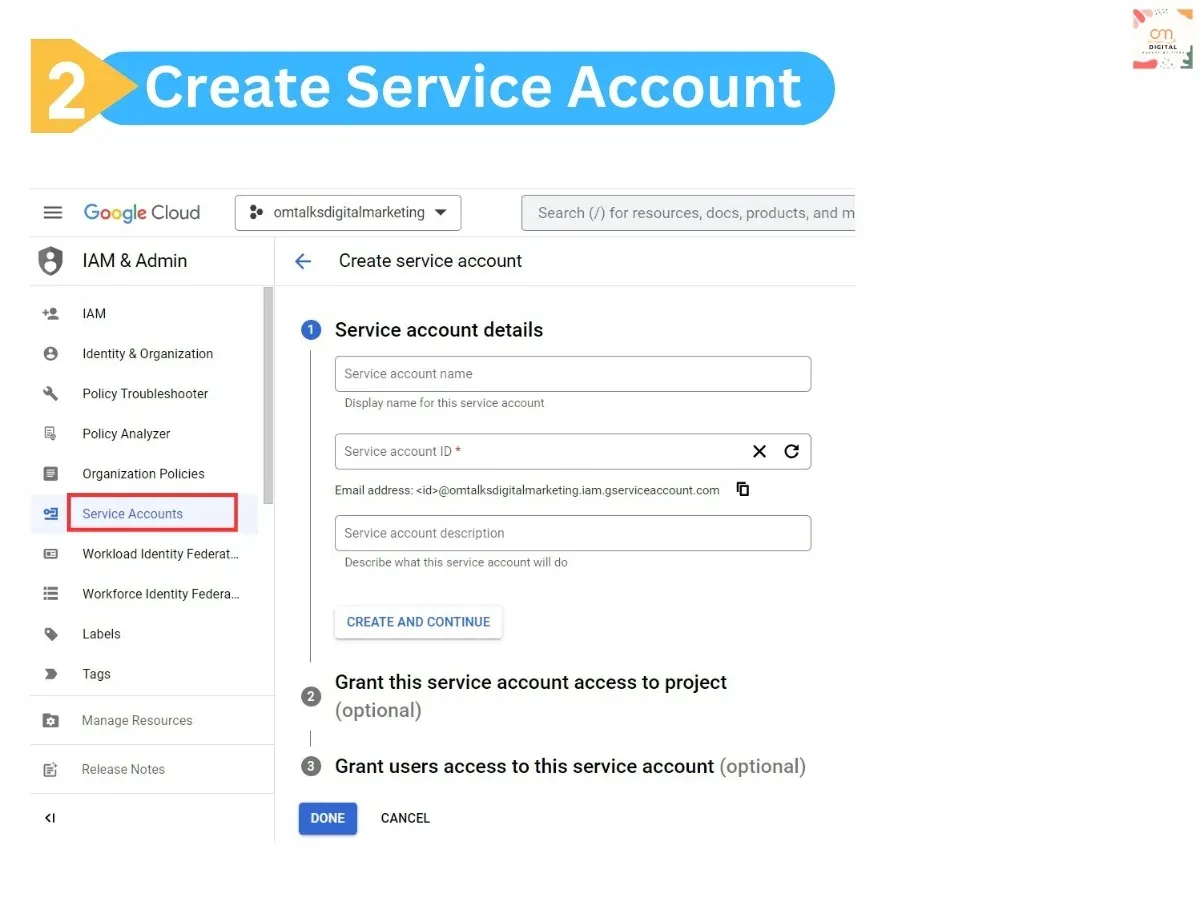
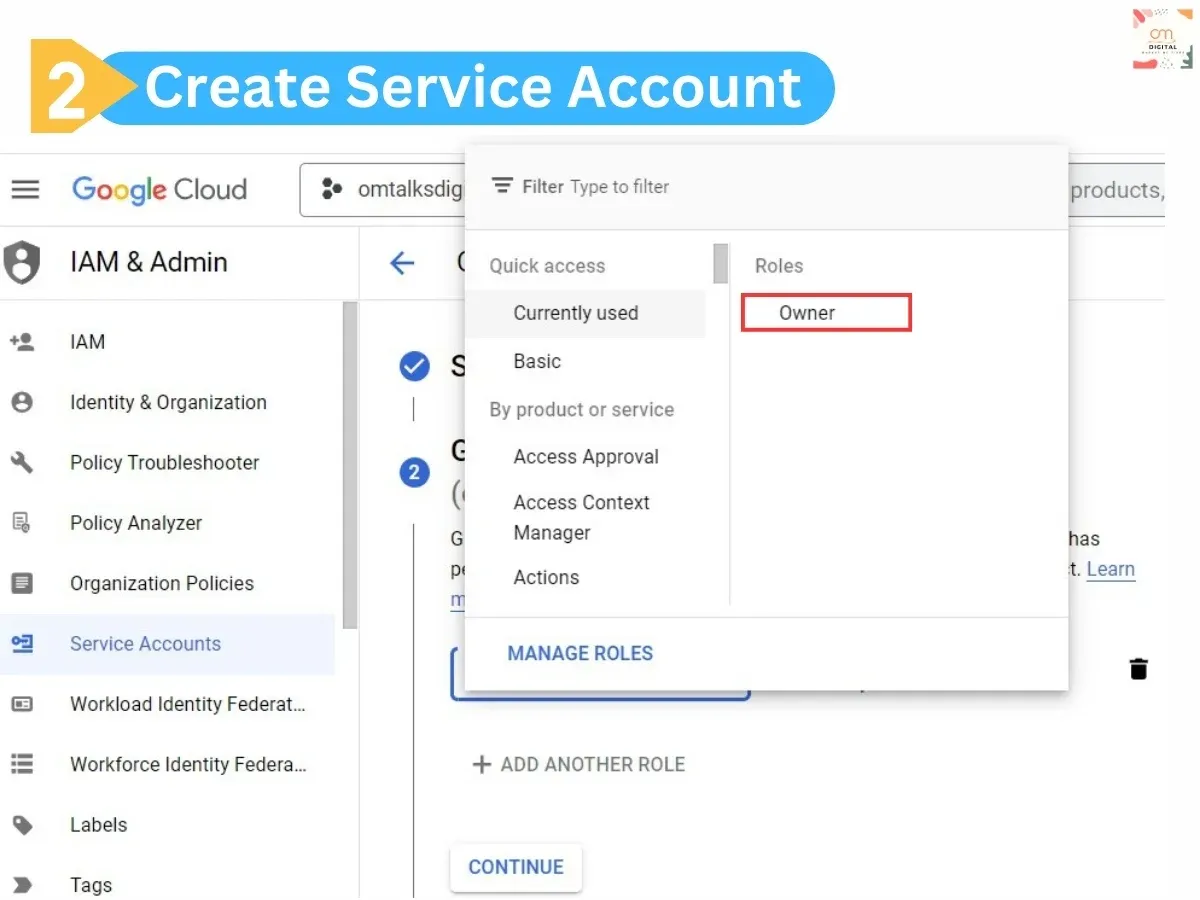
 Click "Create Service Account", name
it, and assign the role "Owner".
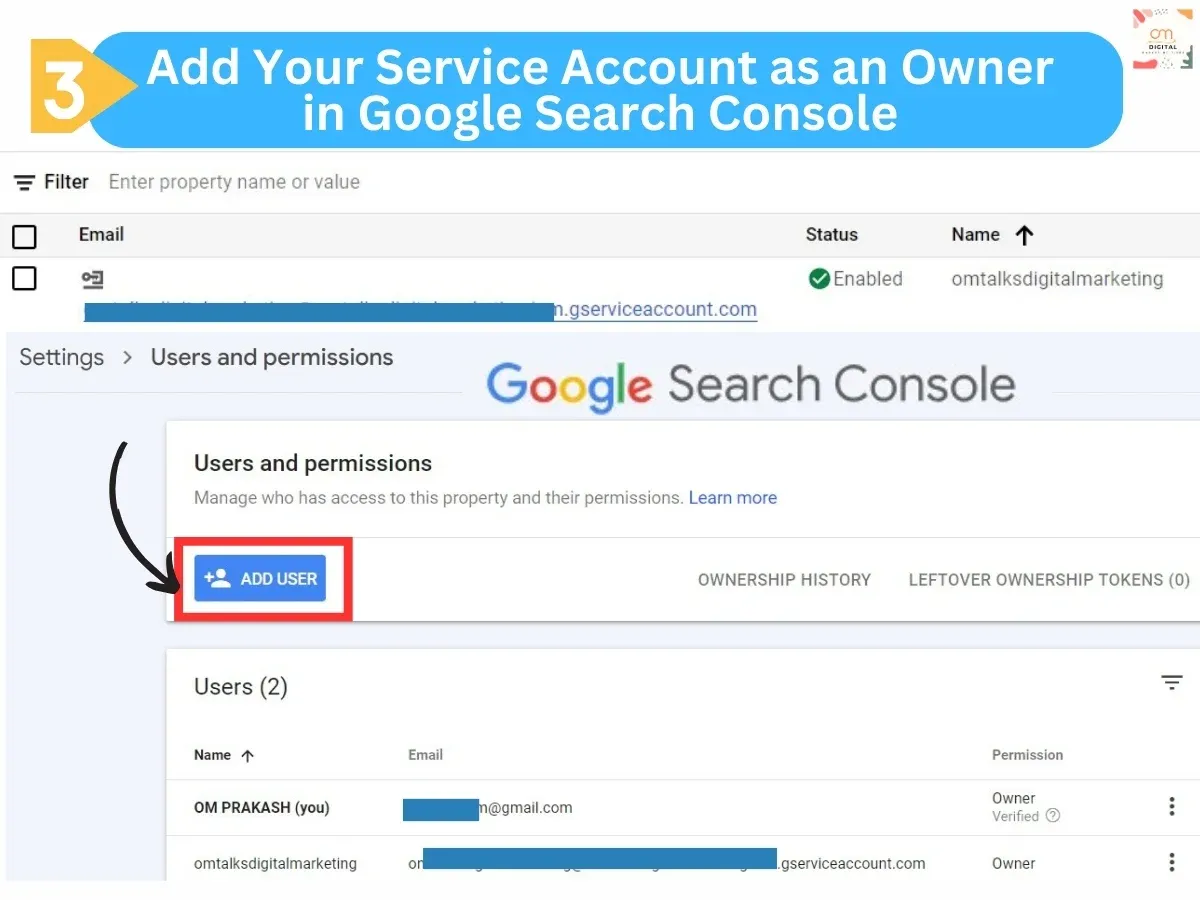
Visit Search Console and add the email from
your Service Account to your website property as an owner.
Now you have Successfully connected your Cloud
Console with Search Console.
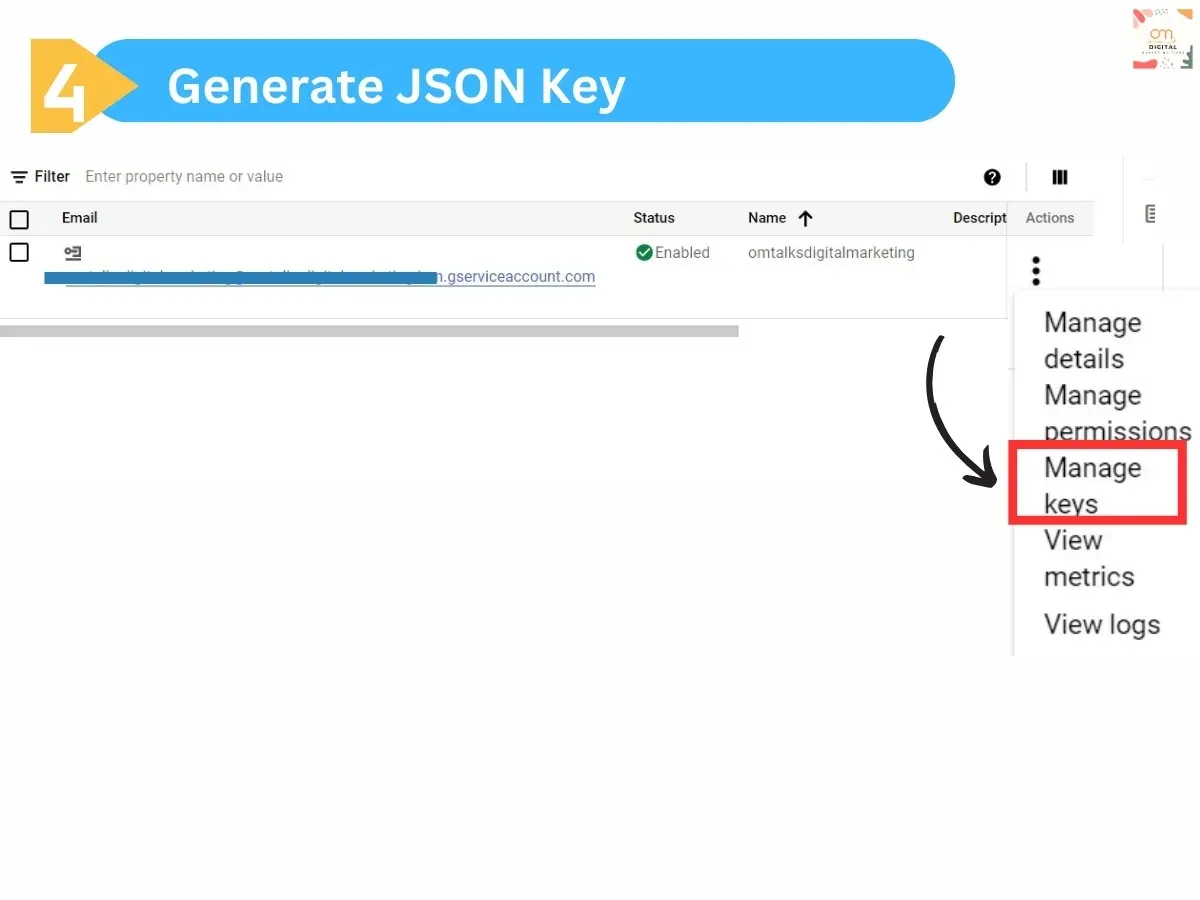
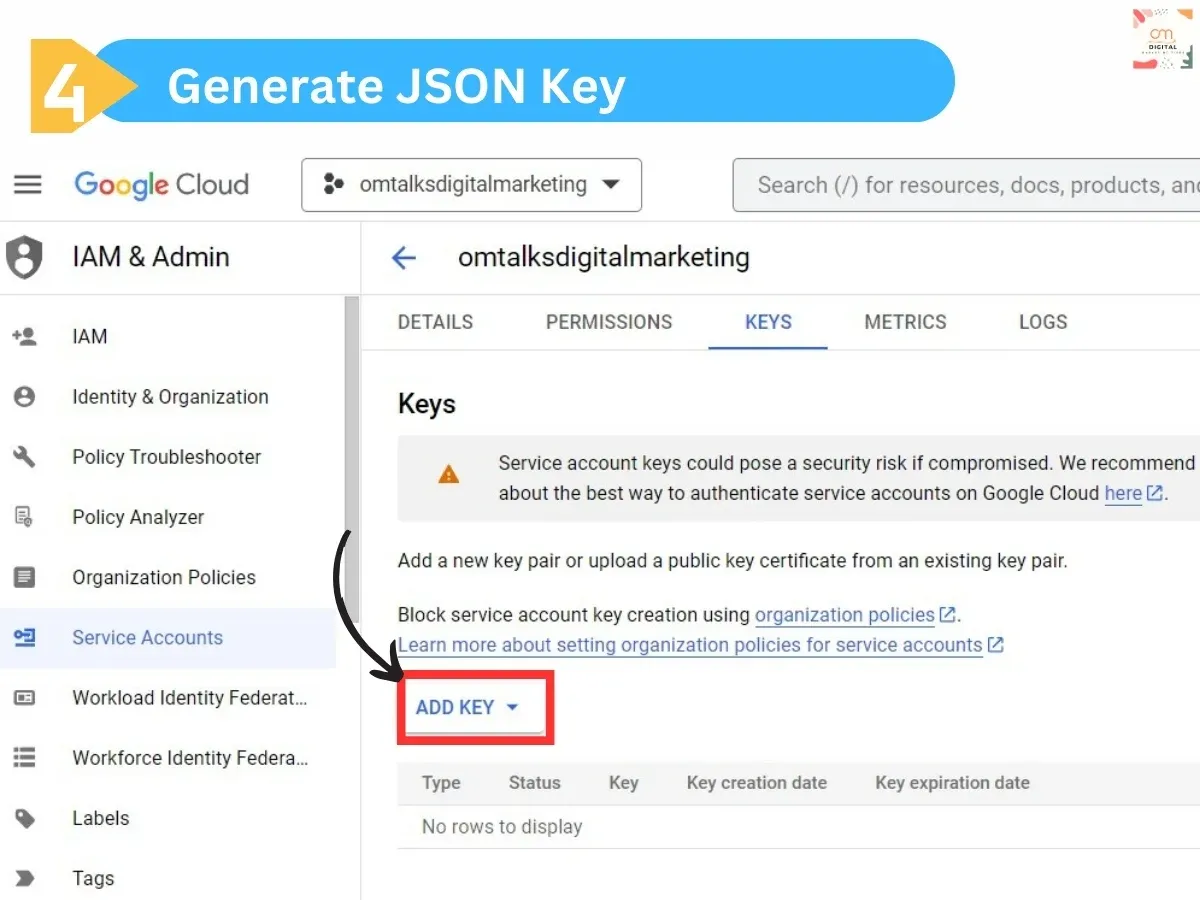
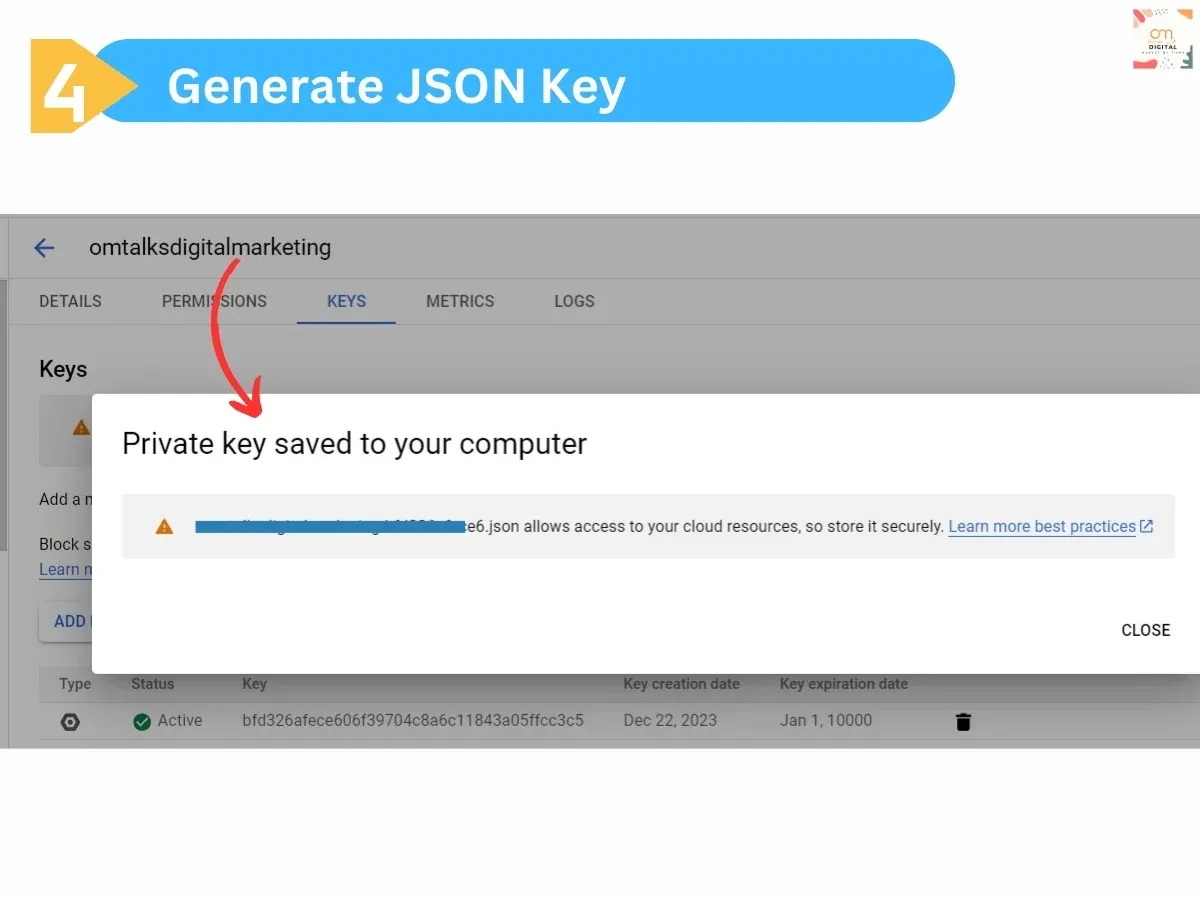
After creating your Service Account, you need to generate a key. Under "Actions", click on the three dots and select "Manage keys".
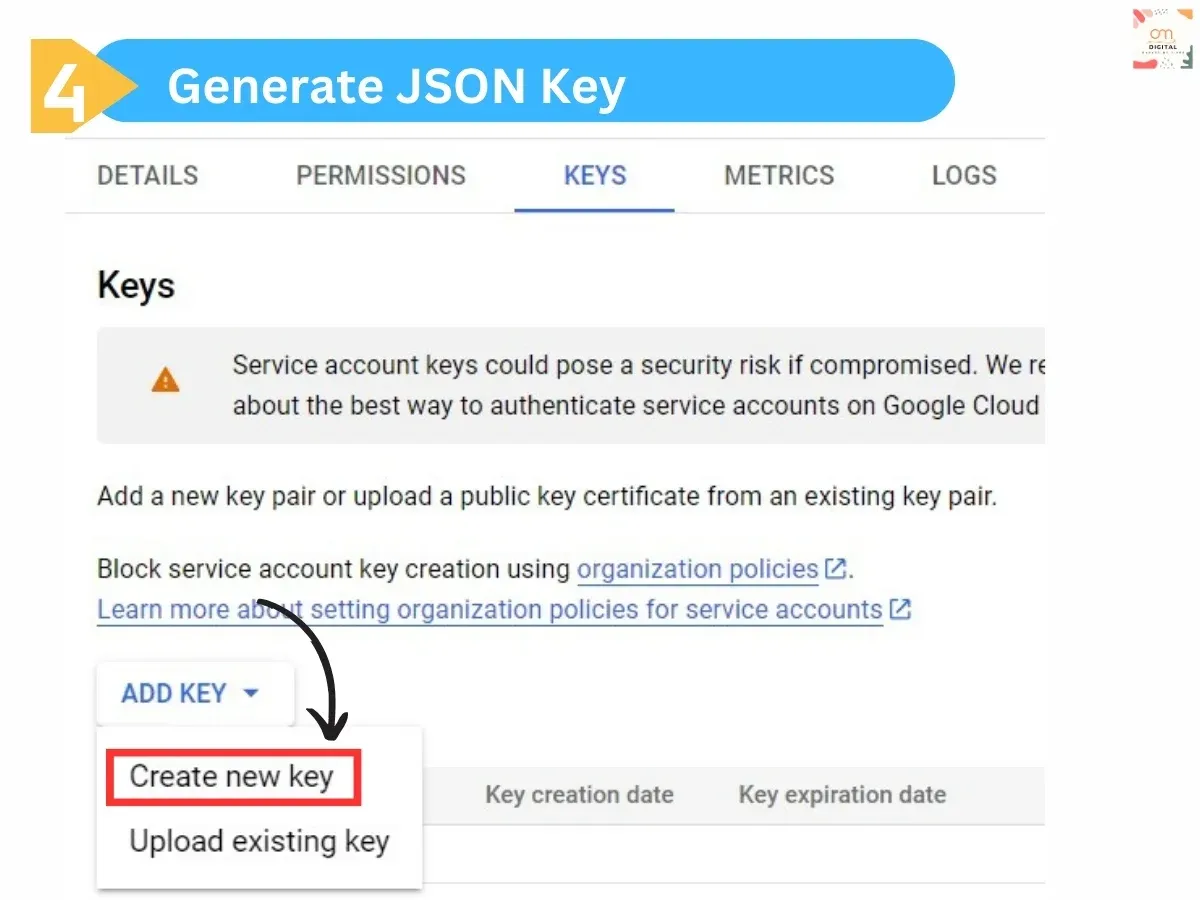
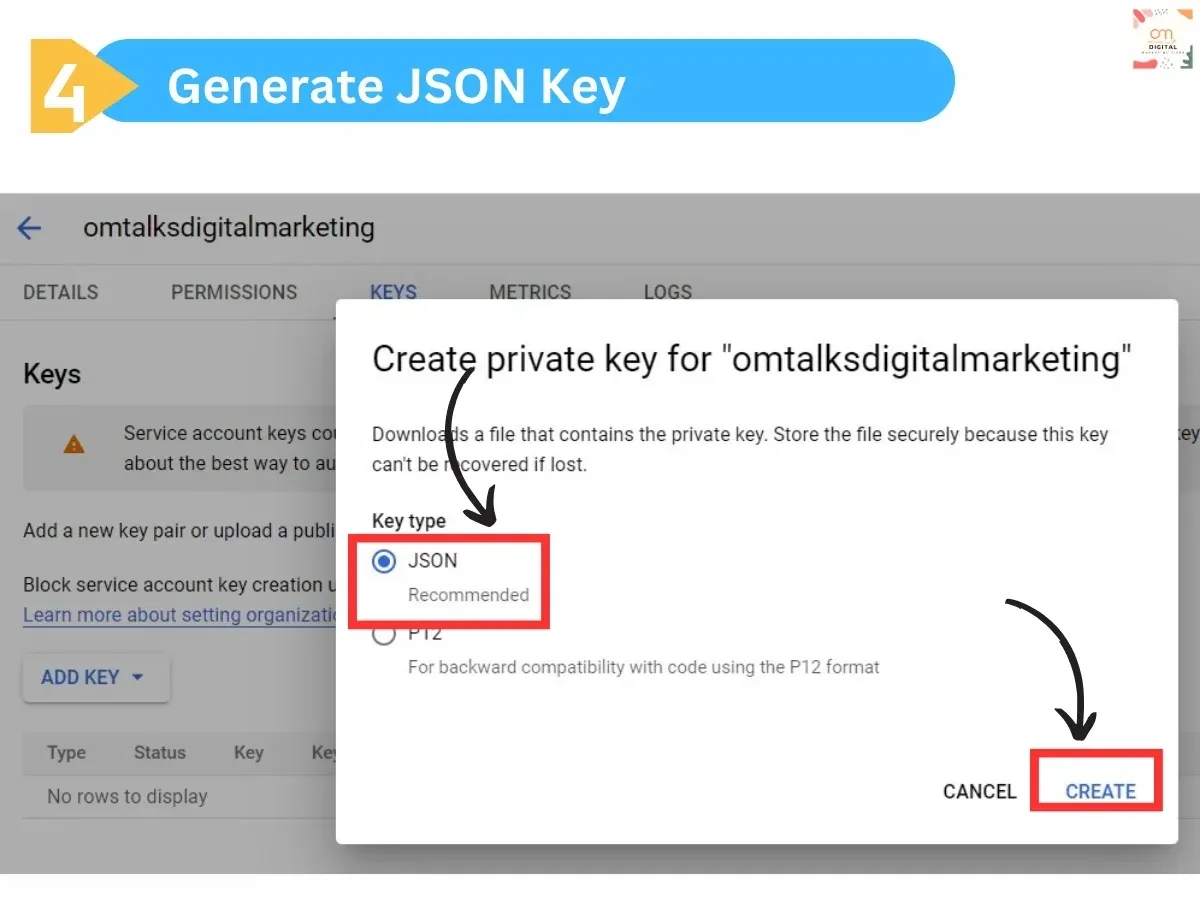
Select "Add Key" then "JSON".
A JSON key file will download - store this
securely.
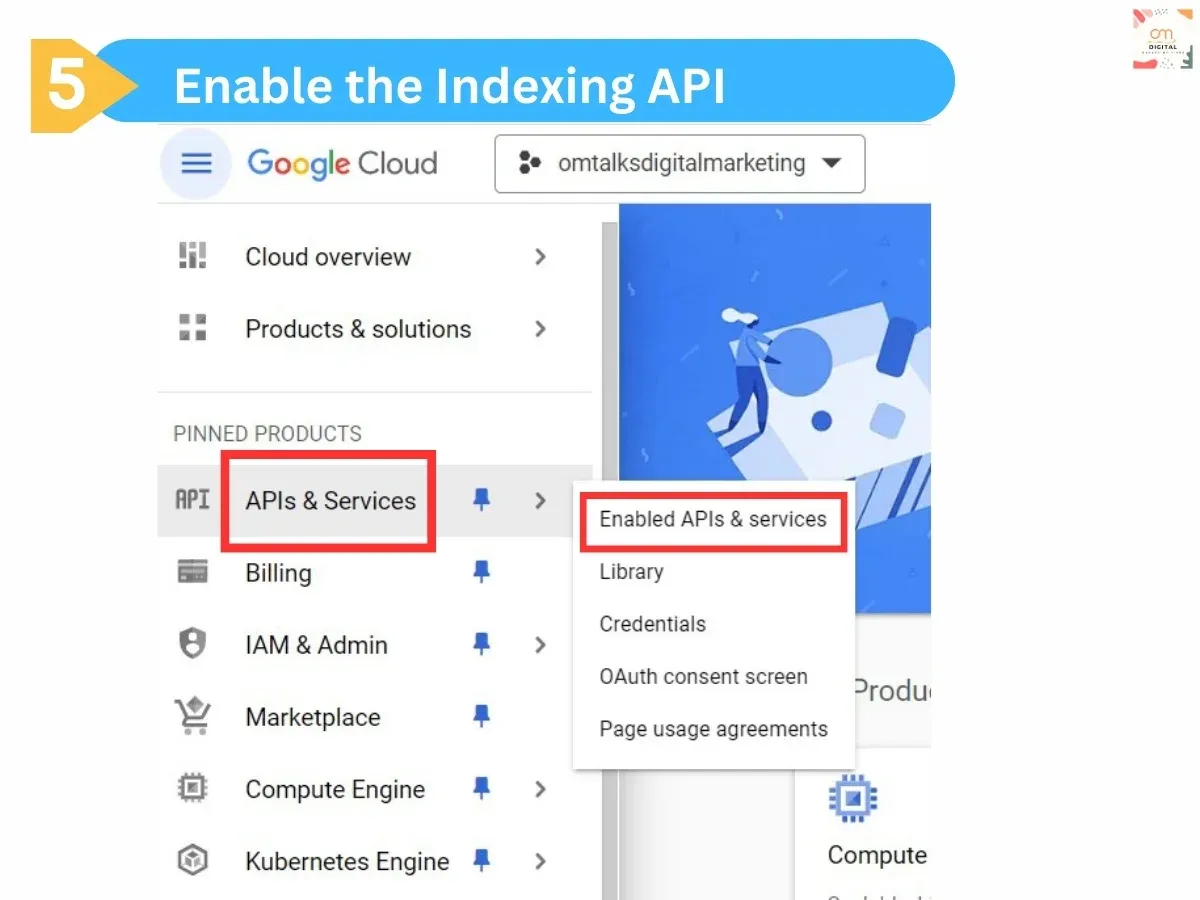
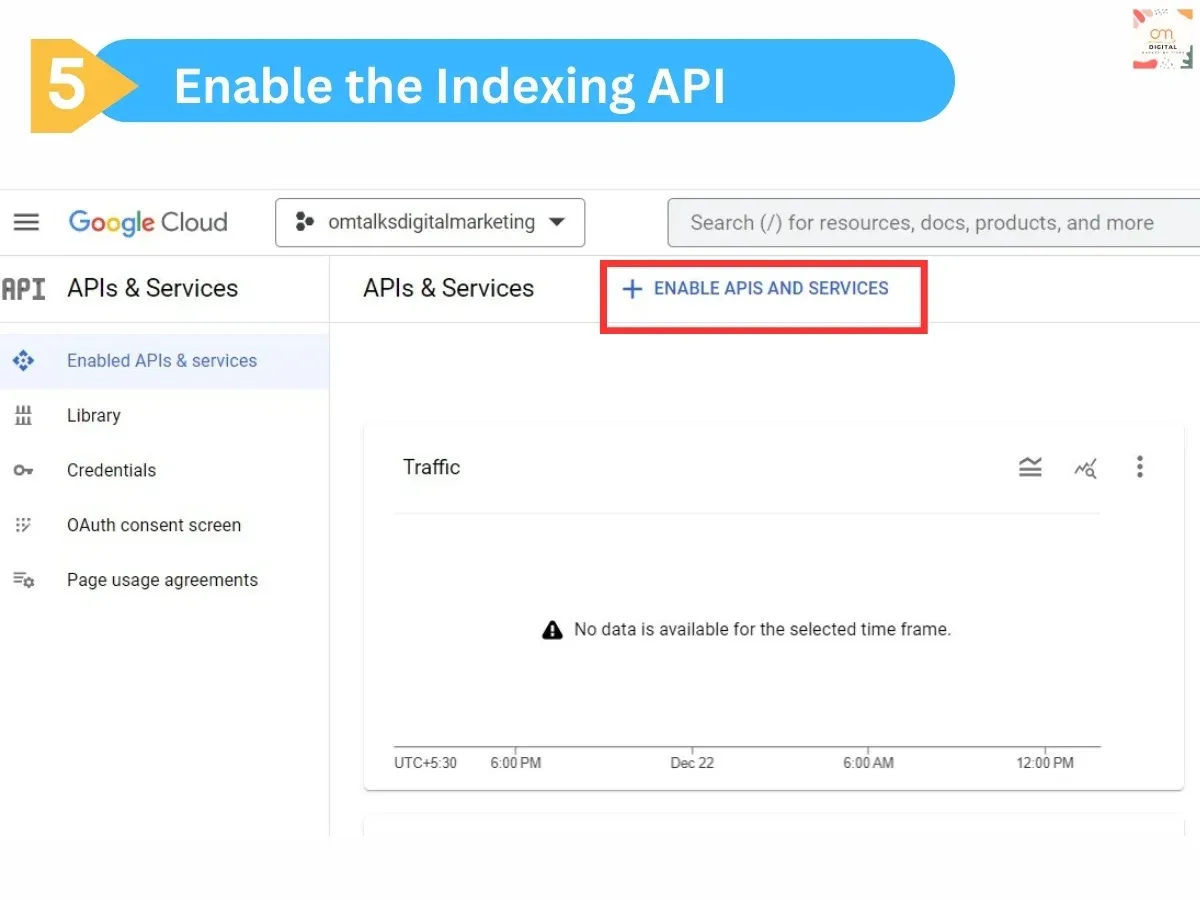
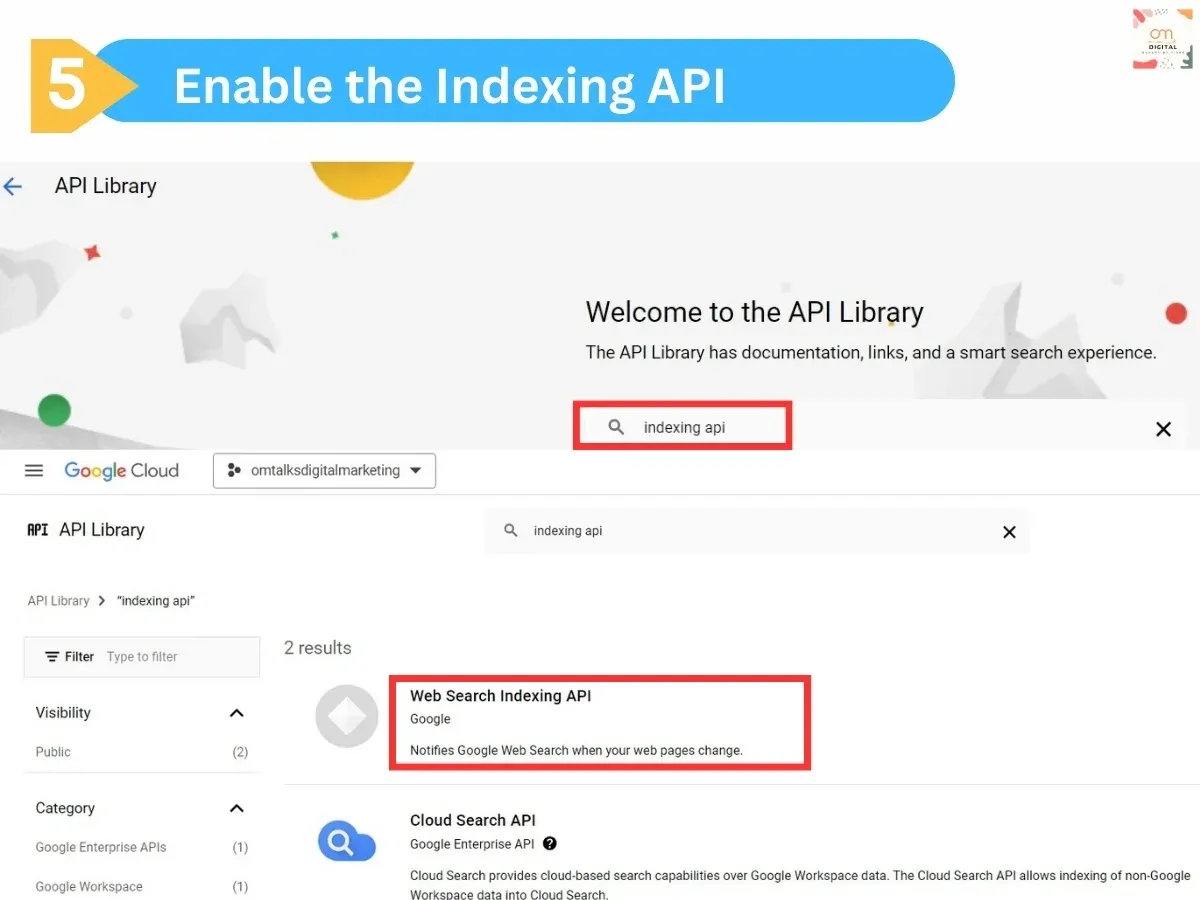
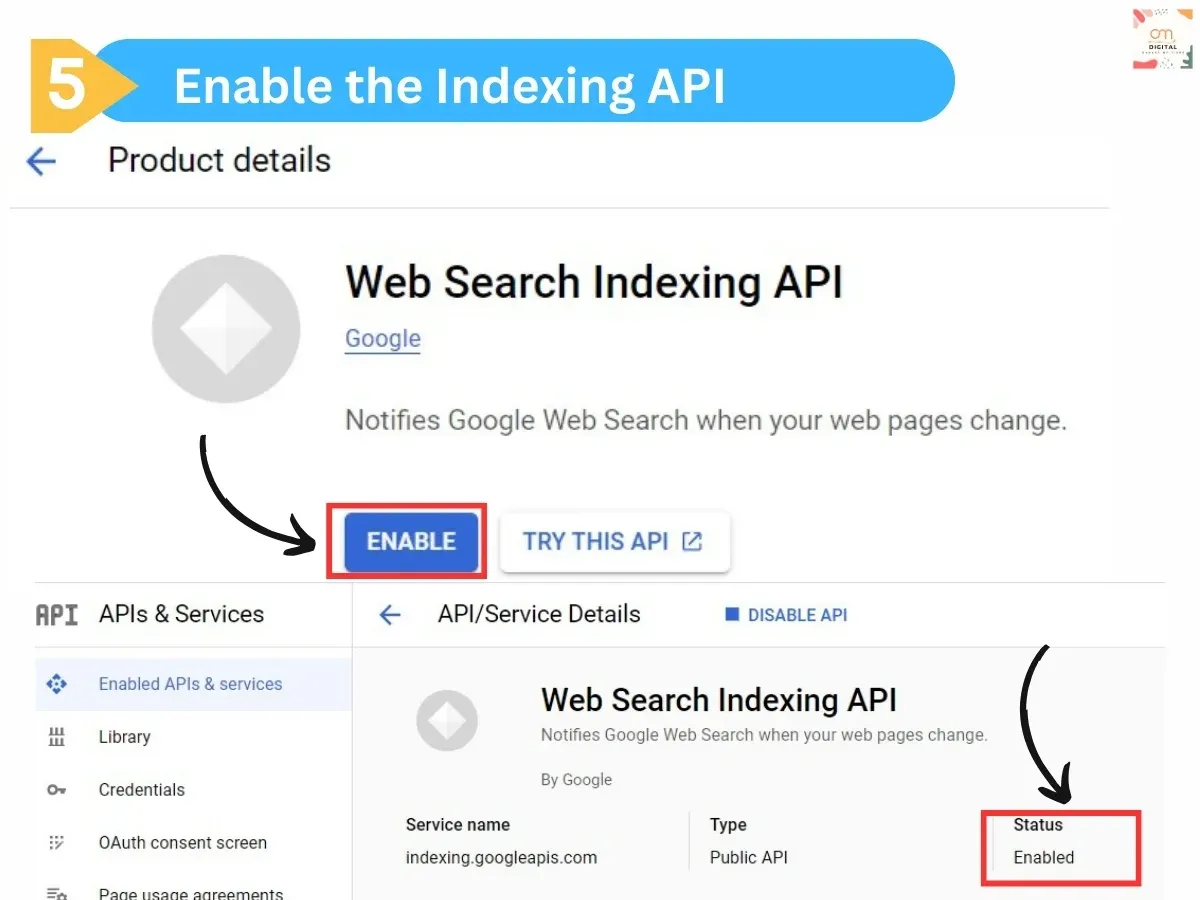
Once your project is created, you'll need to enable the Indexing API. In the dashboard, click on "Enable APIs and Services" and search for 'Indexing API'.
Select it and click "Enable".
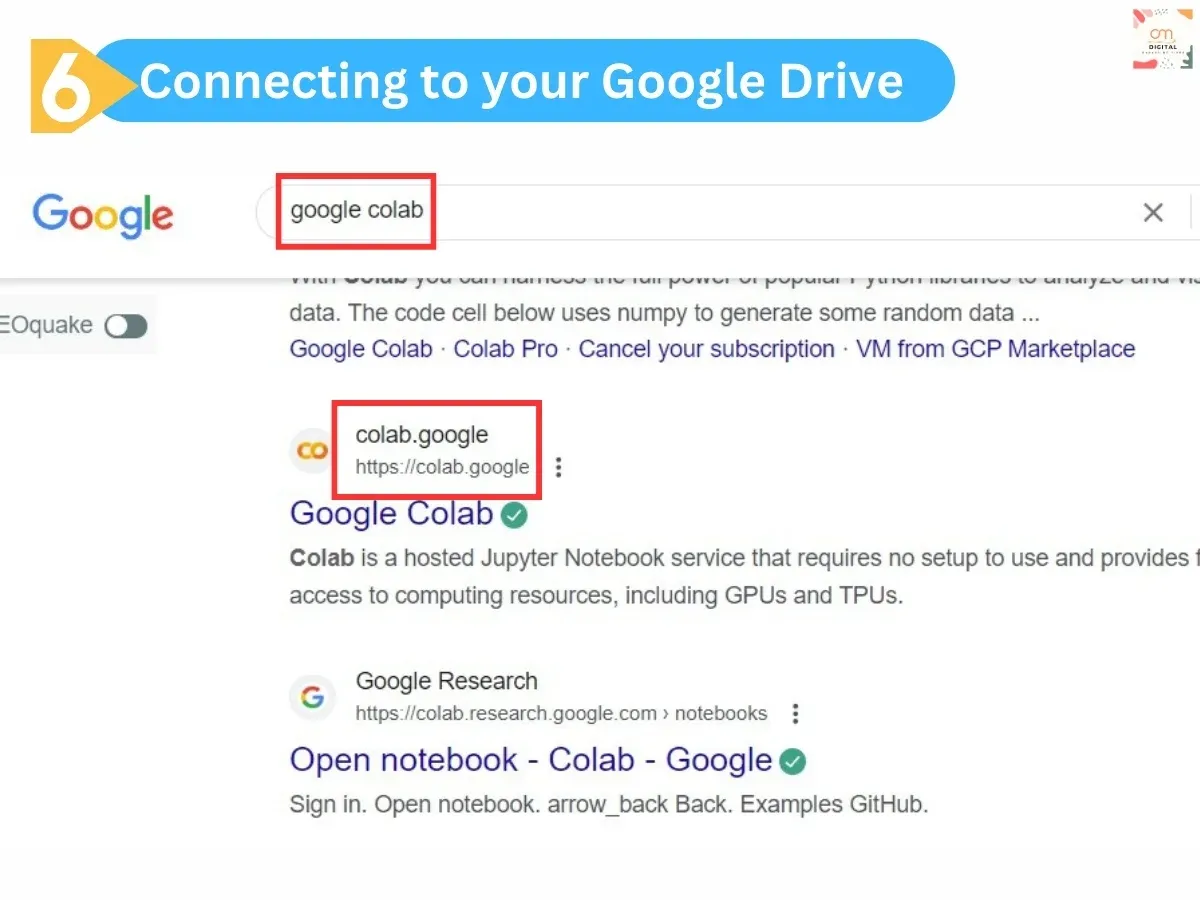
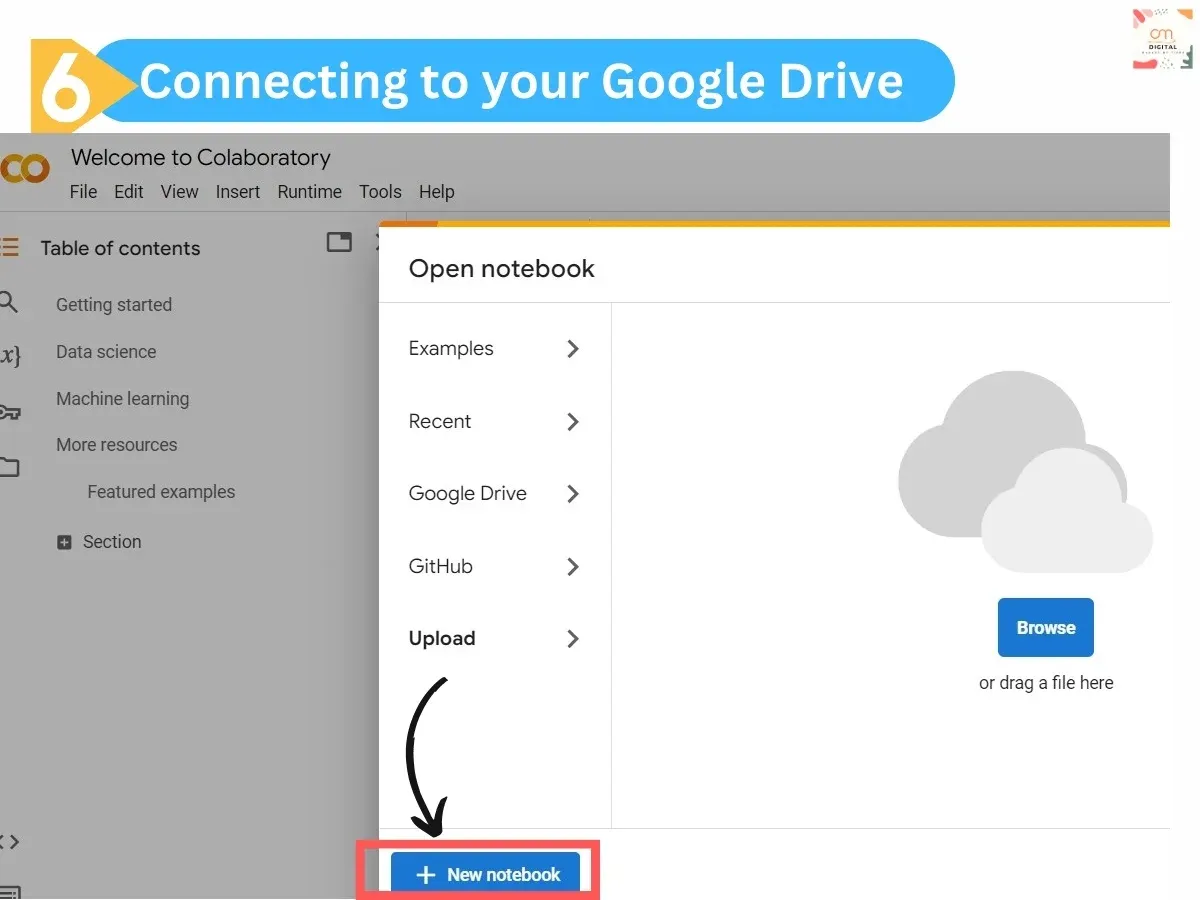
Go to this site “Google Colab” and then click on “open colab” and a new window opens and their select
"New Notebook".
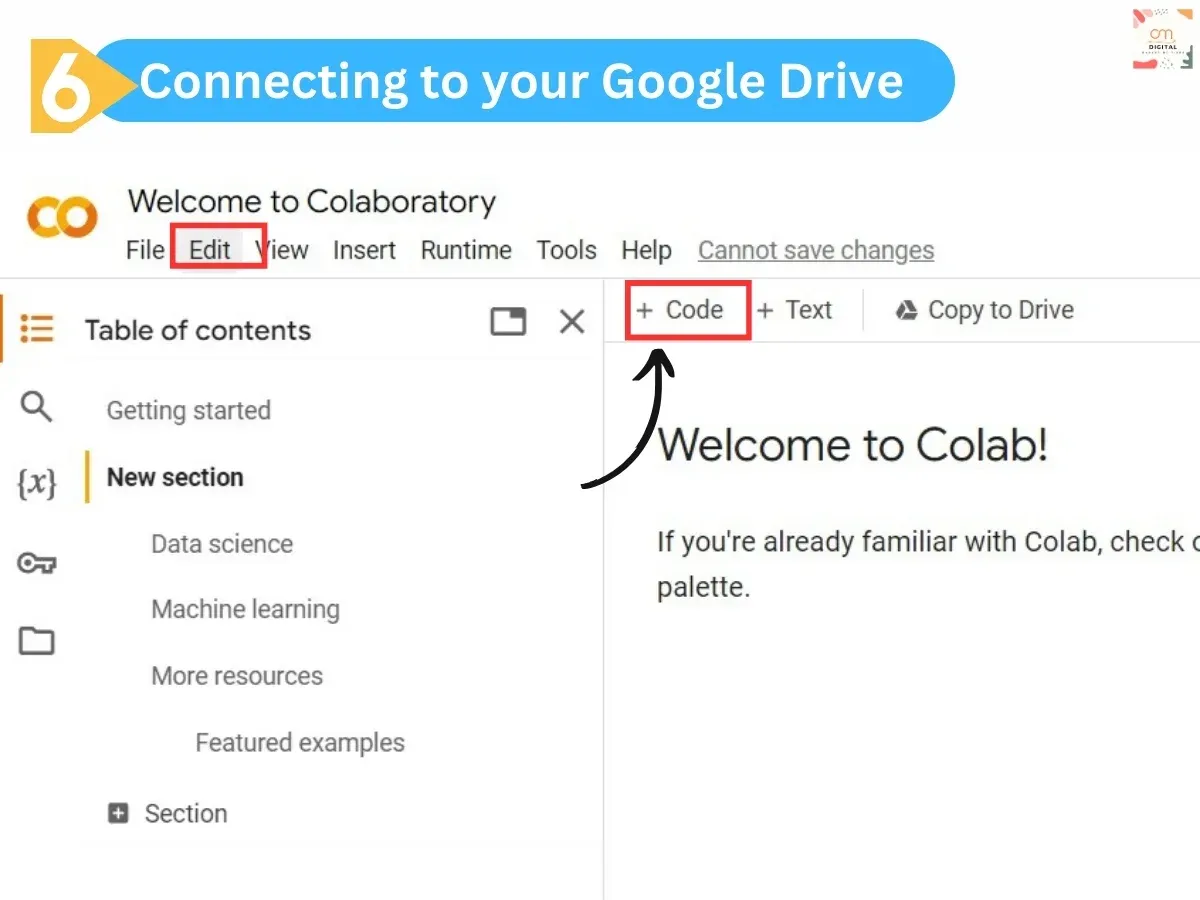
After the notebook opens, click on "+Code".
Paste the code provided below in the input field.
#@title
**Connecting to Your Google Drive**
#@markdown
**To use this method, you have to connect your Google Drive everytime you
Refresh/Disconnect/Reset this notebook in order to use the files saved in your
drive but no need to re-upload the file again**
#@markdown
**Provide Yes > Execute the cell**
Connect_Google_Drive
= "Yes" #@param ["Yes", "No"]
if
Connect_Google_Drive == "Yes":
from google.colab import drive
drive.mount('/content/drive')
print("Successfully Connected!")
else:
print("Not Connected!")
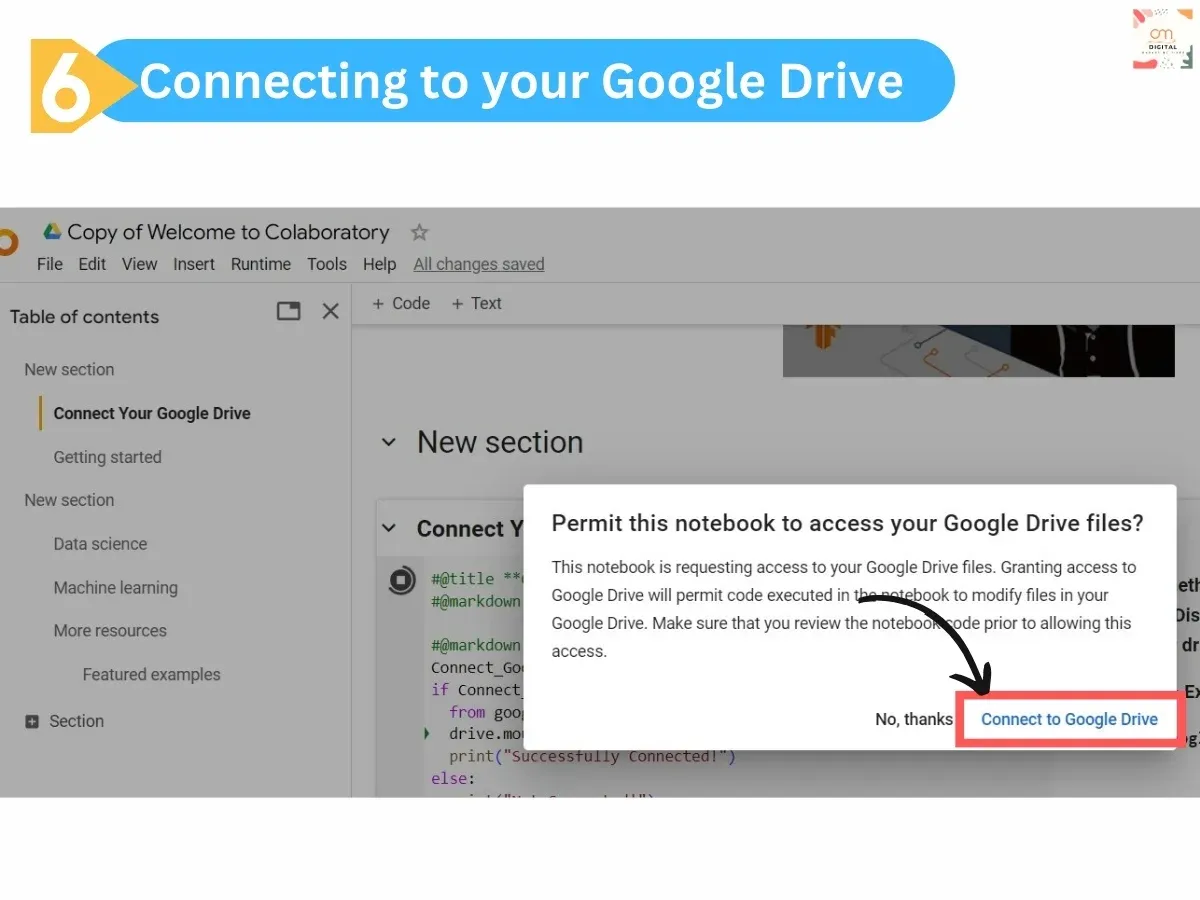
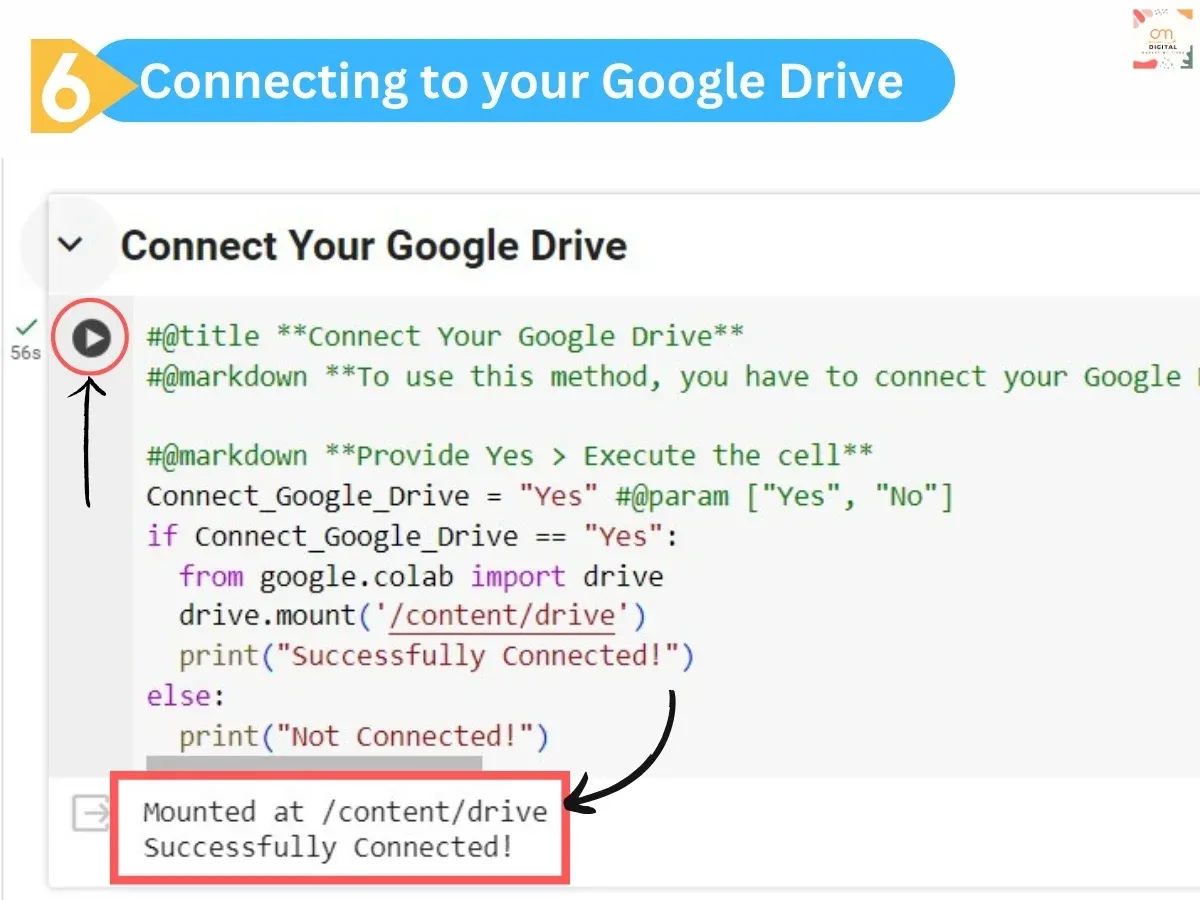
Click on "Run cell". When asked,
select your email ID, then click "Allow" to grant permission. Once
done, you will be re-directed back to the Colab Console tab, where you'll see a
confirmation message stating, “Mounted at /content/drive successfully."
Click on "+Code". Paste the code
provided below in the input field.
#@title
**Replacing your Google Drive Path**
API_Path =
"ADD_YOUR_API_PATH" #@param {type:"string"}
from oauth2client.service_account
import ServiceAccountCredentials
import
httplib2
SCOPES =
["https://www.googleapis.com/auth/indexing"]
ENDPOINT =
"https://indexing.googleapis.com/v3/urlNotifications:publish"
print('*'*50);print("Scopes
& Endpoint Configured...");print('*'*50);print("Adding
Key...");print('*'*50);
#
service_account_file.json is the private key that you created for your service
account.
JSON_KEY_FILE
= API_Path
print("Key
Added Successfully!");print('*'*50);
credentials
= ServiceAccountCredentials.from_json_keyfile_name(JSON_KEY_FILE,
scopes=SCOPES)
http =
credentials.authorize(httplib2.Http())
print("Credentials
Successfully Authorized!");print('*'*50);
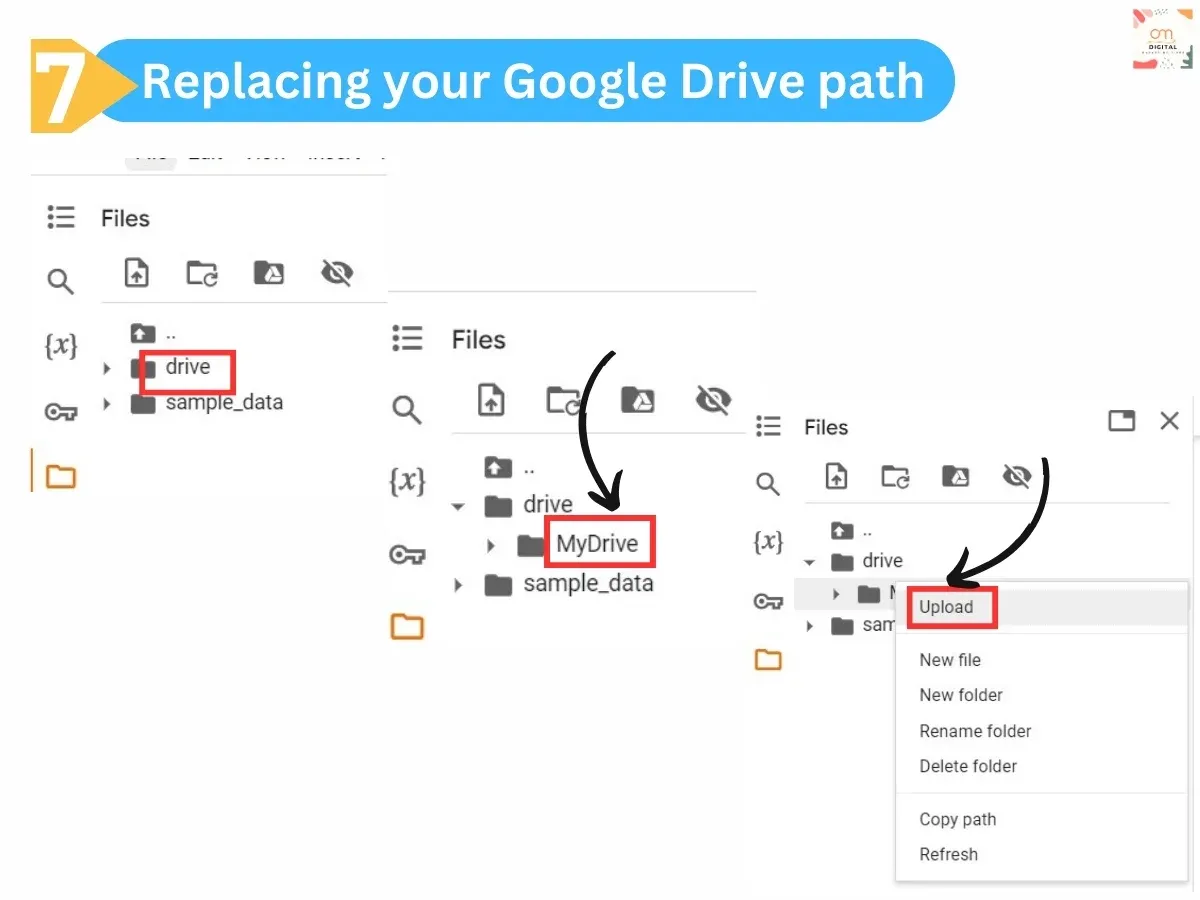
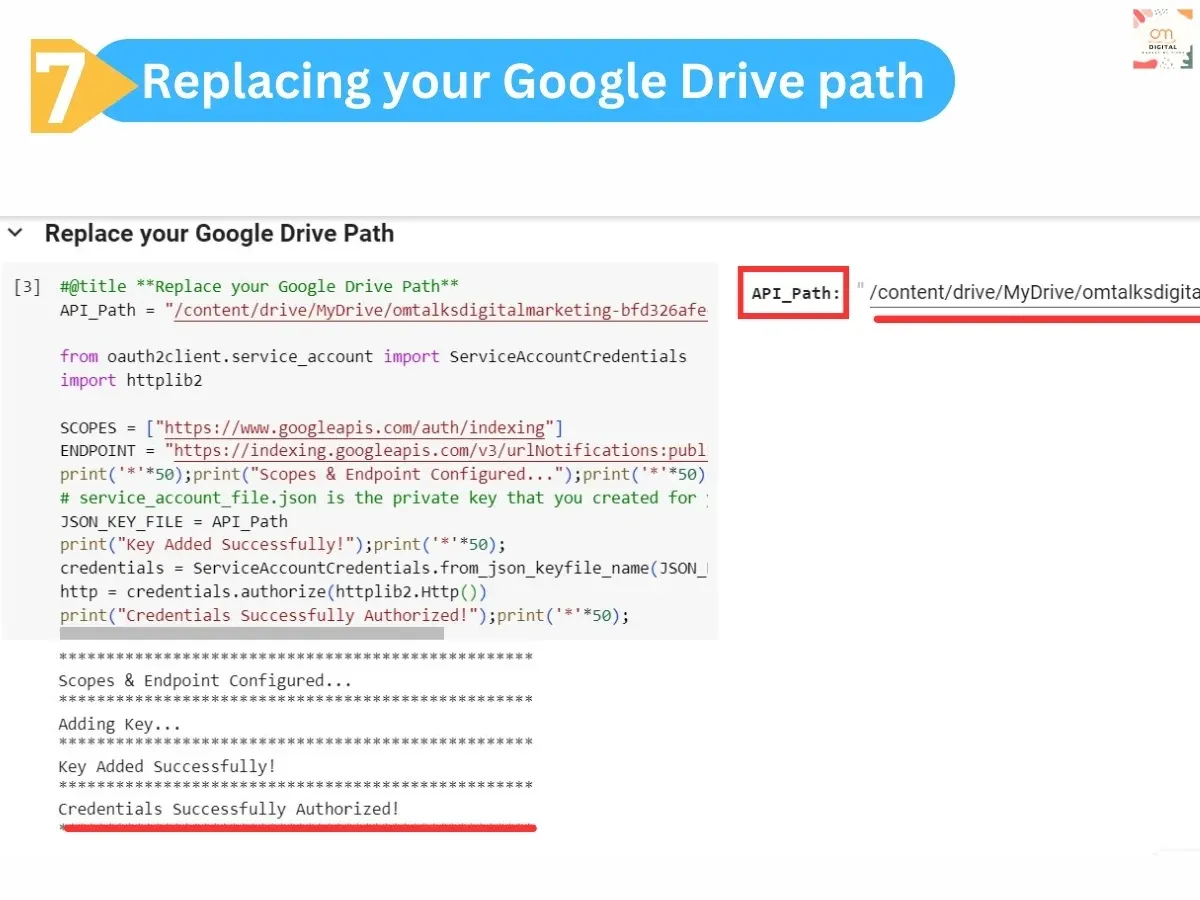
Click on the "Files" icon located
on the left side, then select "MyDrive".
Next, click on the three-dot menu and upload
the JSON file - the one you downloaded when creating the API from Cloud
Console.
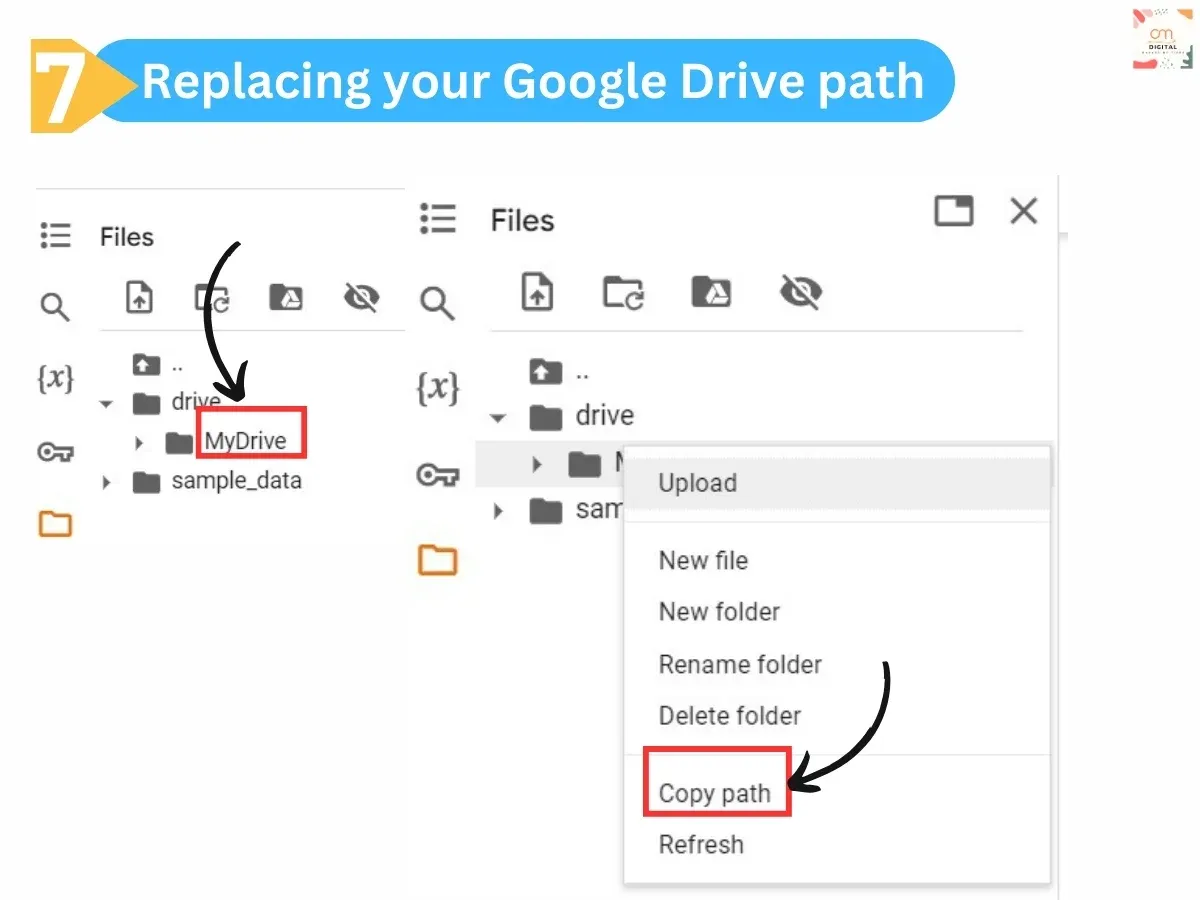
After the upload is complete, click on the
three-dot menu again and then select "Copy path".
Paste the JSON API file address, which you
just copied, and click "Run cell".
You will then receive a success message.
Click on "+Code". Paste the code
provided below in the input field.
#@title **Replacing
Your Blogger URL and Run the Code**
#@markdown
Site URL will the exact URL you want to update or delete from the Google Search
Index. **Also, please make a note that you have to provide URL only for the
ownership verfied website. For any other URLs, it will not work.**
siteURL =
"REPLACE_YOUR_URL" #@param {type:"string"}
requestType
= "URL_UPDATED" #@param ["URL_UPDATED",
"URL_DELETED"]
content =
str({'url':siteURL,'type':requestType})
print("RESULT:");print('*'*50);print("URL
and Update Request Type Configured!");print('*'*50);
response,
content = http.request(ENDPOINT, method="POST", body=content)
output =
response['status']
if output
== '200':
print("Successfully
Done!");print('*'*50);
else:
print("Error Code:
{}".format(output));print('*'*50);
print("Visit Here For More:
https://developers.google.com/search/apis/indexing-api/v3/core-errors#api-errors");
print('*'*50);
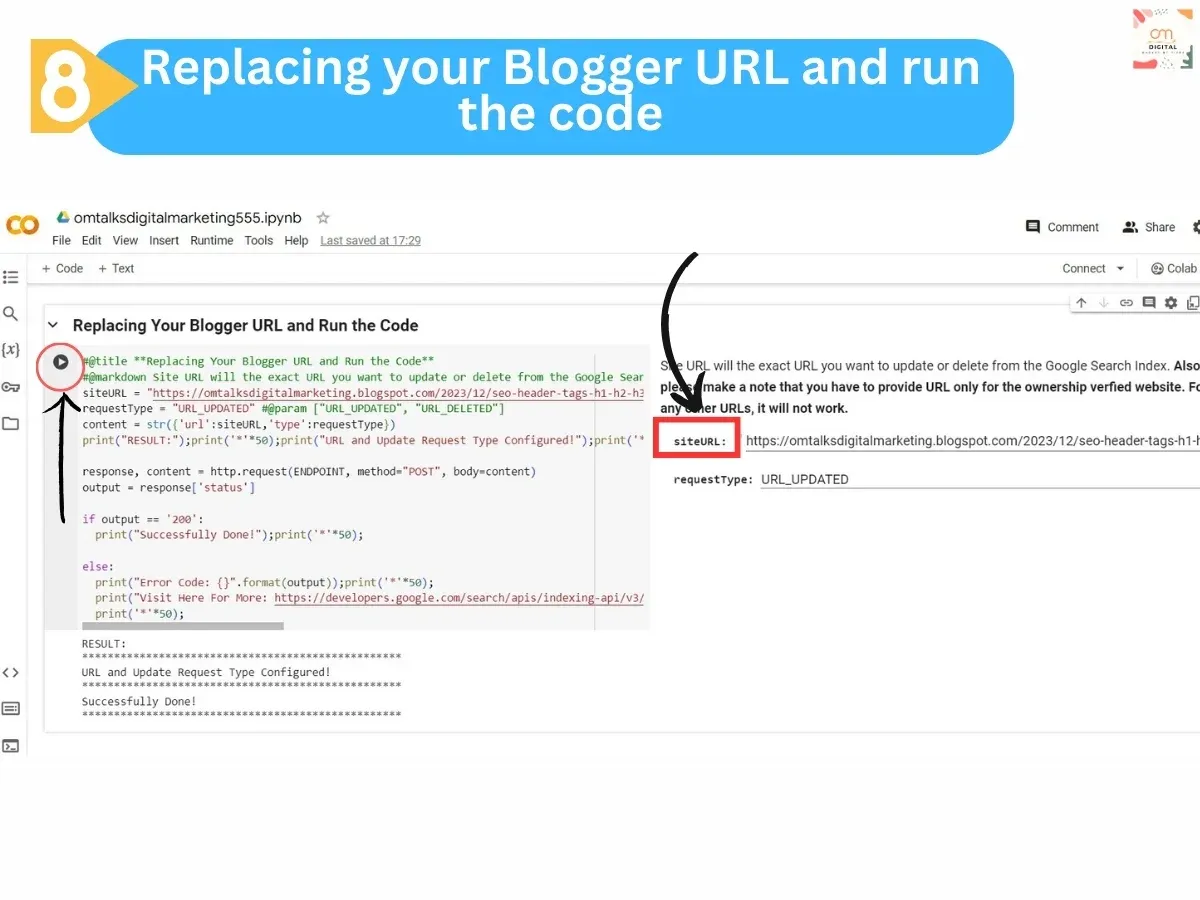
Click on the input field, paste your Blogger
post link, and click "Run cell". A success message will be displayed
confirming the operation.
By following these
steps, you've successfully set up the Google Indexing API for your Blogger
website. Your website will now be efficiently indexed by Google, contributing
to better search engine visibility.



1 Comments
Google drive path code not working properly please solve my problem
ReplyDelete