Every business owner wants to make their site more navigable for users. You can achieve this by creating html sitemap in blogger. It's a roadmap to your website, enabling visitors to understand your site structure better. This guide will walk you through the process of creating it on blogger.
What is an HTML Sitemap and its benefits
An HTML
Sitemap is a page on your website that outlines the full structure of your
site. It includes links to all your pages and posts, making it easier for users
to navigate. It is specifically useful for your visitors, helping them navigate
your website with ease.
 |
Source: Apple store html sitemap page |
· Improves user experience, making it
easier for users to find what they are looking for.
· Increase internal linking, which can improve your site's authority and ranking.
What is an XML Sitemap?
An XML
(Extensible Markup Language) sitemap is a text file written in a
machine-readable language. It functions as a roadmap for search engines,
helping them understand the structure of your website and index its pages more
efficiently. An XML lists all URLs of a website together with additional
metadata about each URL (such as last update, change frequency, and importance
relative to other URLs).
 |
| Source: Apple Store XML sitemap page |
They are not designed to be seen by website visitors. Their intended audience is principally search engine crawlers or 'bots' that scan and index sites.
XML vs HTML Sitemap: The Differences
The primary
differences between these two types of these two lies in their intended
audience, purpose, and how they're structured.
Step by Guide:
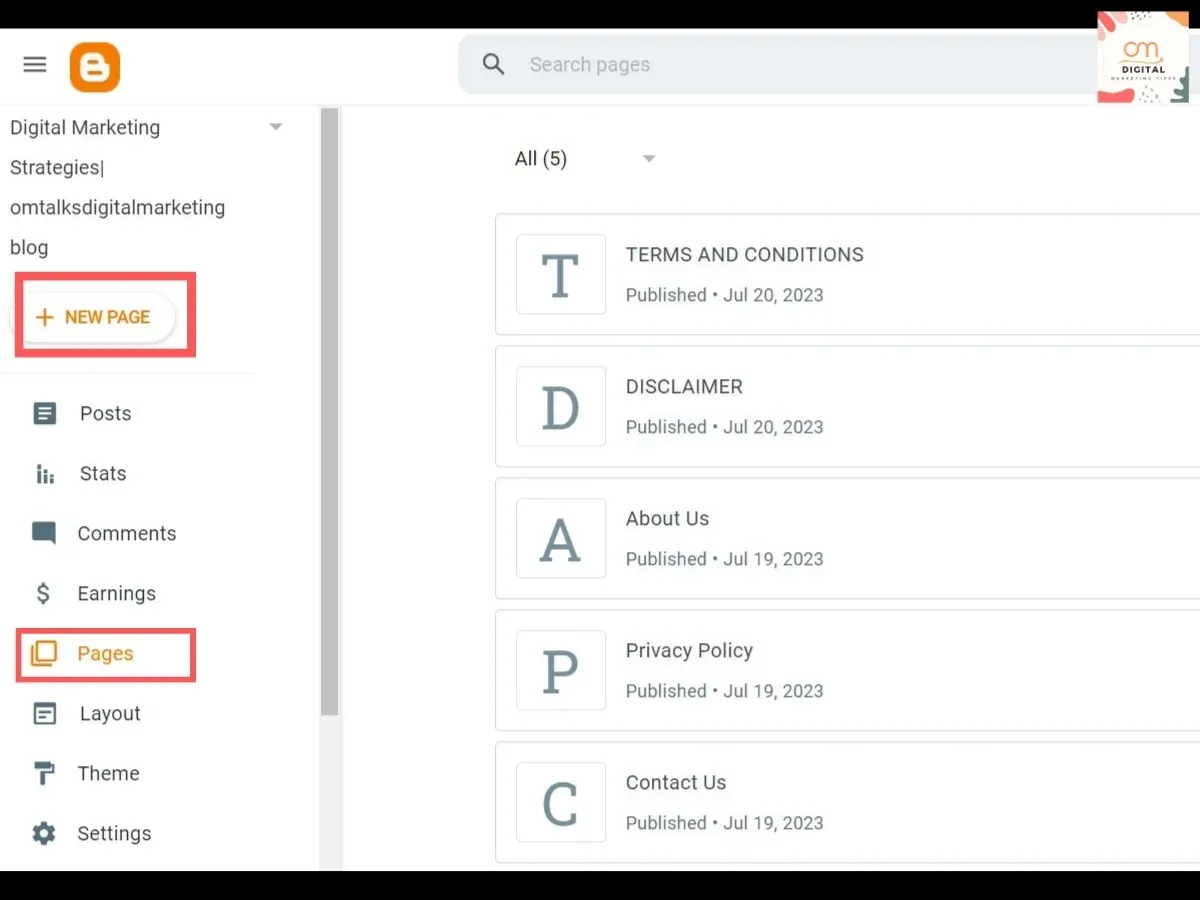
Log into
your Blogger account. Navigate through the dashboard into "Pages",
then click on "New Page". Title the page as 'Sitemap', or something
similar depending on your preference.
Now, it's
time to input the HTML code. The code will instruct Blogger on how to handle
the sitemap page. Paste the code below into the page's body:
<script
style="text/javascript">
var numposts = 100;
var standardstyling = true;
function showrecentposts(json) {
for (var i = 0; i < numposts; i++) {
var entry = json.feed.entry[i];
var posttitle = entry.title.$t;
var posturl;
if (i == json.feed.entry.length) break;
for (var k = 0; k < entry.link.length; k++) {
if (entry.link[k].rel ==
'alternate') {
posturl =
entry.link[k].href;
break; }}
document.write('<li>');
document.write('<a href="' + posturl + '">' + posttitle
+ '</a><br>');
document.write('</li>');}}
</script>
<script
src="/feeds/posts/default?orderby=published&alt=json-in-script&callback=showrecentposts">
</script>
Once the
code is embedded, hit the "Publish" button. Your new page is now live
and will update automatically whenever you publish new content.
Lastly, test
your page to confirm it’s working as it should. Simply visit
`www.yourwebsitename.com/p/your-sitemap.html` and check if all your posts are
listed.
Go to the “Layout”
section under blogger settings and add your sitemap page in header and footer
section for easy user navigation.
By
strategically placing this page in both the header and footer sections of your
website, you can significantly enhance user experience and simplify navigation.
It acts as
the ultimate librarian, guiding visitors with ease and efficiency. Positioned
prominently in the header, it offers an immediate overview of your website's
architecture, allowing users to grasp the available content at a glance.
Whether they're seeking product details, company history, or contact
information, your visitors can swiftly navigate through the page to find their
desired destination.
Reinforcing
this intuitive approach, replicate the page in the footer section. This
strategic placement provides users with a consistent and easily accessible
reference point throughout their browsing journey.
Conclusion
Implement these steps on your Blogger and enhance your SEO efforts today! Remember, a good SEO strategy not only increases your blog's visibility but also contributes significantly to driving in traffic and engagement.


1 Comments
Hello. I did as you described but nothing worked. Can you help me fix it? Maybe I have some kind of coded template?
ReplyDelete